【WordPress】GA4連携の人気記事ランキング機能を自作プラグイン化してみた
【WordPress】
投稿ページをプラグインなしで
AMP化してみる
目次
AMP(Accelerated Mobile Pages)
AMPは、GoogleとTwitterが共同開発したモバイルページを高速で表示させるためのフレームワークです。
うまく取り入れるとモバイルページを爆速表示させられます。
公式ドキュメントはこちら。

AMP Websites - amp.dev
https://amp.dev/ja/about/websites/
WordPressの記事をAMP化したい。プラグインなしで。
固定ページなどもすべてAMP化するのはけっこう手間がかかるので、とりあえずブログ記事だけAMP化しようと思います。また、今回はプラグインなしでやってみます。
というのも、できるだけデザインは変えたくない。
そしてプラグインのカスタマイズの方法を調べると英語のドキュメントでけっこうややこしそう。AMPドキュメント見て自分で作るのとあんまり工数変わらんのではないかな。
Classic Templates : AMP for WordPress
https://amp-wp.org/documentation/how-the-plugin-works/classic-templates/
プラグインは確かに優秀かもしれませんが、結局すべてのデザインを独自のものに変えるとなると、最初から自分で作った方が個人的には楽かもと思いました。プラグインのカスタマイズで詰まったりしたら本末転倒な気がします。また、自分で一から作ることでAMP化に必要なこと・AMPでできることも頭に入ると思います。きっと。
AMPの基本設定
AMPは独自のルールがあり、独自のHTMLタグや必須のJS、CSSの記述など、様々な制限があります。少しでもルールに合わないとエラーとなりAMPとして認識してくれません。WordPressで作る前に基本的なルールを押さえておきます。
必須のマークアップ
1、ampの宣言
最上位階層のタグを<html ⚡>にする。<html amp>でも可。
<!DOCTYPE html>
<html ⚡>
<head>
・・・
2、必須のメタタグ
UTF-8のエンコードとビューポートをレスポンシブにします。
<meta charset="utf-8">
<meta name="viewport" content="width=device-width,minimum-scale=1,initial-scale=1">
3、canonical
canonicalを通常のhtmlページに設定します。
<link rel="canonical" href="通常のhtmlページのURL">4、AMP JSライブラリ
head要素の子要素の2番目にAMP JSライブラリを追記します。
<!DOCTYPE html>
<html ⚡>
<head>
  <meta charset="utf-8">
  <script async src="https://cdn.ampproject.org/v0.js"></script>
  <meta name="viewport" content="width=device-width,minimum-scale=1,initial-scale=1">
・・・
5、CSSボイラープレート
AMP ボイラープレート コードを<head>要素内に追記します。
<style amp-boilerplate>body{-webkit-animation:-amp-start 8s steps(1,end) 0s 1 normal both;-moz-animation:-amp-start 8s steps(1,end) 0s 1 normal both;-ms-animation:-amp-start 8s steps(1,end) 0s 1 normal both;animation:-amp-start 8s steps(1,end) 0s 1 normal both}@-webkit-keyframes -amp-start{from{visibility:hidden}to{visibility:visible}}@-moz-keyframes -amp-start{from{visibility:hidden}to{visibility:visible}}@-ms-keyframes -amp-start{from{visibility:hidden}to{visibility:visible}}@-o-keyframes -amp-start{from{visibility:hidden}to{visibility:visible}}@keyframes -amp-start{from{visibility:hidden}to{visibility:visible}}</style><noscript><style amp-boilerplate>body{-webkit-animation:none;-moz-animation:none;-ms-animation:none;animation:none}</style></noscript>6、html
DOCTYPE宣言<!DOCTYPE html>と<head> タグと <body> タグは必須です。
7、外部ファイルは基本的に禁止
Font AwesomeやGoogleフォントなど許可されている一部CDNを除いて、CDNや外部ファイルは制限されており、使えません。
構造化マークアップ(Schema.org)
AMP対応ページをGoogle検索結果のニュースカルーセルに表示させるにはSchema.orgというJSON-LD形式の構造化マークアップが必要になります。
構造化マークアップのルールについてはここで書くと脱線しそうなので割愛させていただきます。
AMPの公式ドキュメントを参考に以下のように作ります。実際にこのサイトのAMPページで使っているものです。
<script type="application/ld+json">
  {
    "@context"         : "http://schema.org",
    "@type"            : "BlogPosting",
    "mainEntityOfPage" :
    {
      "@type"            : "WebPage",
      "@id"              : "通常ページのURL"
    },
    "headline" : "ページタイトル",
    "image"    :
    {
      "@type"  : "ImageObject",
      "url"    : "アイキャッチ画像のURL",
      //サイズは横1200px以上が推奨
      "width"  : 2160,
      "height" : 900      },
      "datePublished" : "2019-10-20T08:00:42+09:00",
      "dateModified"  : "2019-10-25T23:51:53+09:00",
      "author"        :
      {
        "@type" : "Person",
        "name"  : "InoueYosuke"
      },
      "publisher"     :
      {
        "@type"  : "Organization",
        "name"   : "notes by SHARESL",
        "logo"   : {
        "@type"  : "ImageObject",
        "url"    : "AMPカルーセルに表示されるロゴのURL",
        //サイズは幅600px・高さ60px推奨。ぴったりではないので高さの上限に合わせておく
        "width"  : 343,
        "height" : 60
      }
    },
    "description"     : "サイトの説明"
  }
</script>
サイトに合わせてこちらを変更すればそのまま使えると思います。
WordPressの場合は該当する部分にphpの関数を使って動的に出力させますのでそれは後ほど説明します。
このJSON-LDを全部ちゃんとした値で埋めて<head>内に追記し、Google 構造化データ テストツールでテストしてエラーがなければOKです。
画像
<img>タグはすべて<amp-img>タグに置き換えます。また、ほとんどの場合width・heightは省略できません。AMP化するときに<img>タグが1つでも残っていたらエラーになります。
ページをリンクさせる
AMPのURLはオリジナルのページとURLが違うので、アノテーションを行います。これをすることで検索エンジンが同じページとして認識してくれるようになります。
具体的にはAMPページには「必須のマークアップ」の部分で設定したcanonicalリンクがまず必要です。
そしてオリジナルページには<head>要素にamp用のアノテーションタグを追記します。
<link rel="amphtml" href="AMPページのURL">以上が基本的な設定です。
ここまでの話は公式ドキュメントを見ればほとんど書いてあります。
WordPressの投稿記事をAMP化
前置きが長くなりましたが、ここからが本題です!
WordPressの投稿記事のみをAMP化するために、single.phpを改良してテンプレートを作ります。その前に必要な関数やフックをfunctions.phpに追記していきます。
URLをリライトする
ampページをどういうURLで表示させるか。ググるとよく出てくるのが、https://notes.hogehoge.com/test/?amp=1
といったように通常のURLの最後に?amp=1というパラメータを付けるもの。
たしかにこれが1番簡単で、phpで判定するのもすごく簡単です。
ただ、なんか嫌です。笑
ということでリライトします。https://notes.hogehoge.com/test/amp/
パラメータでなく、ディレクトリで切る形にします。
/*
* AMP URLのリライト
*/
function custom_rewrite_amp() {
add_rewrite_tag('%amp%', '([^&]+)');
add_rewrite_rule('^articles/([^/]*)/amp/?$', 'index.php?p=$matches[1]&=1', 'top');
}
add_action('init', 'custom_rewrite_amp');
/*
* AMPページへのリダイレクト
*/
function amp_redirect() {
if(!is_singular('post')){
return;
}
$amp = filter_input(INPUT_GET, 'amp') ? filter_input(INPUT_GET, 'amp', FILTER_SANITIZE_NUMBER_INT) : 0;
if(intval($amp) === 1 ){
$post_id = get_queried_object_id();
if(empty($post_id)){
return;
}
$url = home_url("/articles/${post_id}/amp/");
wp_safe_redirect($url);
exit;
}
}
add_action('template_redirect', 'amp_redirect');簡単に説明すると、
- 新たに「amp」というリライトタグ名を追加
- 投稿ページのURLに/amp/をつけてアクセスした場合は「?amp=1」というパラメータが追加されたURLと同じ意味になるようにリライトルールを追加
- ?amp=1でアクセスがあった場合はリダイレクト
ということを行いました。リダイレクトなんか設定しなくてもなんか方法があると思ったのですが、ググっても情報がなかったのでゴリ押しリダクレクトしました。笑
必要な関数を用意する
ここからは動的にAMPページを作成するために必要な関数をfunctions.phpに追記していきます。
AMPページかどうか判定する
/*
* AMPページ判定
*/
function is_amp() {
  $amp = get_query_var('amp');
  $amp = intval($amp);
  return ($amp === 1);
}さきほどadd_rewrite_tagで「amp」というリライトタグを追加したので、それをget_query_var('amp')で取得します。/amp/でアクセスしたときは?amp=1と同じなので、AMPページであれば1が返ってきます。そうでなければ空で返ってきますのでこれで判定します。
アイキャッチ画像を取得する
/*---------------------------------------------------*/
/*  AMP用アイキャッチ出力
/*---------------------------------------------------*/
function amp_eyecatch_img($size = null){
  if(!$size) { $size = "full"; }
  global $post;
  $thm_id     = get_post_thumbnail_id($post->ID);
  $image      = wp_get_attachment_image_src($thm_id, $size);
  $attachment = get_post($thm_id);
  $alt        = get_post_meta($attachment->ID, '_wp_attachment_image_alt', true);
  $src        = $image[0];
  $width      = $image[1];
  $height     = $image[2];
  $img        = '<amp-img layout="responsive" src="'.$src.'" width="'.$width.'" height="'.$height.'" alt="'.$alt.'"></amp-img>';
  return $img;
}


/*---------------------------------------------------*/
/*  AMP用アイキャッチ情報
/*  @param {String} $param width/height/srcのどれかを渡すと返ってくる
/*---------------------------------------------------*/
function amp_eyecatch_info($param = null){
  //defaultはsrc
  if(!$param) { $param = "src"; }

  global $post;
  $thm_id       = get_post_thumbnail_id($post->ID);
  if(!empty($thm_id)){
    $image      = wp_get_attachment_image_src($thm_id, 'full');
    $attachment = get_post($thm_id);
    $alt        = get_post_meta($attachment->ID, '_wp_attachment_image_alt', true);
  }
  else {
    $image      = [
      get_theme_file_uri('assets/images/default-amp.jpg'),
      1600,
      900
    ];
    $alt        = get_the_title();
  }

  //$paramの文字列で返す値を判定
  if($param === 'src'){
    return $image[0];
  }
  elseif($param === 'width'){
    return $image[1];
  }
  elseif($param === 'height'){
    return $image[2];
  }
  else {
    return $image[0];
  }
}the_post_thumbnail()などの関数で画像を出力すると、<amp-img>になっていませんし、余計なclassやsrcsetなどの属性が付いてしまうのでフィルターフックで調整しなくてはいけません。それは面倒臭いので<amp-img>で出力するシンプルな関数にしました。アイキャッチがない場合にデフォルトの画像もテーマ内に用意しておきます。
また、width/height/srcのどれかの情報を個別に欲しい場合があるのでその関数もついでに書いておきました。
本文を最適化する
ここが個人的に1番つらくなった部分ですが、phpで正規表現で本文中の不要なタグを全て排除して出力します。AMPはHTMLのルールがかなり厳格なので、エディターが自動で付ける属性などを削除するのにけっこう手間がかかりました。かなりひどいコードになってしまいましたので、あまり参考になるかはわかりません。正規表現難しい・・・。
/*---------------------------------------------------*/
/*  @Template
/*  AMP用コンテンツ出力
/*---------------------------------------------------*/
function get_amp_contents(){
  //レスポンシブイメージの無効化
  remove_filter( 'the_content', 'wp_make_content_images_responsive' );
  $content = apply_filters( 'the_content', get_the_content() );
  $content = str_replace( ']]>', ']]>', $content );

  $content = preg_replace('/<(.*?)style=".*?"(.*?)>/is', '<$1$2>', $content);
  //古い絵文字削除
  $content = preg_replace('/<img(.*?)class="emoji"(.*?)>/is', '', $content);
  $content = preg_replace('/<img src="(.*?)blog-imgs-(.*?).fc2.com\/emoji\/(.*?)>/is', '', $content);
  $content = preg_replace('/<img src="(.*?)static.fc2.com\/(.*?)>/is', '', $content);
  //filter
  $content = preg_replace('/<table(.*?)>(.*?)<\/table>/is', '<div class="table-scroll"><table>$2</table></div>', $content);
  $content = preg_replace('/<col(.*?)>/is', '<col>', $content);
  $content = preg_replace('/<tr(.*?)>/is', '<tr>', $content);
  $content = preg_replace('/<th(.*?)>/is', '<th>', $content);
  $content = preg_replace('/<td(.*?)>/is', '<td>', $content);
  $content = preg_replace('/<br(.*?)>/is', '<br>', $content);
  $content = preg_replace('/<hr(.*?)>/is', '<hr>', $content);
  $content = preg_replace('/<script\b[^>]*>(.*?)<\/script>/is', '', $content);
  $content = preg_replace('/<style\b[^>]*>(.*?)<\/style>/is', '', $content);
  $content = preg_replace('/<fb:like\b[^>]*>(.*?)<\/fb:like>/is', '', $content);
  $content = preg_replace('/<fb:comments\b[^>]*>(.*?)<\/fb:comments>/is', '', $content);
  $content = preg_replace('/<script .*?>(.*?)<\/script>/is', '', $content);
  $content = preg_replace('/<script type="text\/javascript">.*?<\/script>/is', '', $content);
  $content = preg_replace('/<fb:like (.*?)><\/fb:like>/is', '', $content);
  $content = preg_replace('/<fb:comments .*?><\/fb:comments>/is', '', $content);
  // img要素すべて持ってくる
  $patternAtr   = '/<img(.*?)>/is';
  preg_match_all($patternAtr, $content, $imgMatches);
  $targetWidth  = 320;
  $patternSrc   = '/src="(.*?)"/is';
  foreach ($imgMatches[1] as $value) {
    $value2 = preg_replace('/class="(.*)"/is', '', $value);
    preg_match($patternSrc, $value, $srcval);

    if(!isset($srcval[1])) {
      continue;
    }

    list($width, $height, $type, $attr) = @getimagesize($srcval[1]);

    if(!empty($width) && !empty($height)){
      $targetHeight = round($targetWidth / $width * $height);
      $append       = '<amp-img src="'.$srcval[1].'" layout="responsive" width="'.$targetWidth.'" height="'.$targetHeight.'"></amp-img>';
      $srcval       = preg_replace('/\//', '\\/', $srcval);
      $srcval       = preg_replace('/\./', '\\.', $srcval);
      $patternLast  = '/<img(.*?)src="'.$srcval[1].'"(.*?)>/is';
      $content      = preg_replace($patternLast, $append, $content);
    }
    else {
      $patternAtr   = '/<img (.*?)>/is';
      $content      = preg_replace($patternAtr, '', $content);
    }
  }
  $content = preg_replace('/<img (.*?)>/is', '<amp-img layout="responsive" \1></amp-img>', $content);
  $content = preg_replace('/<img (.*?) \/>/is', '<amp-img layout="responsive" \1></amp-img>', $content);
  $content = preg_replace('/<(.*?)onclick=".*?"(.*?)>/is', '<$1$2>', $content);
  $content = preg_replace('/<(.*?)onmouseover=".*?"(.*?)>/is', '<$1$2>', $content);
  $content = preg_replace('/<(.*?)oncontextmenu=".*?"(.*?)>/is', '<$1$2>', $content);
  $content = preg_replace('/<a(.*?)target=".*?"(.*?)>/is', '<a$1$2>', $content);
  $content = preg_replace('/<(.*?)marginwidth=".*?"(.*?)>/is', '<$1$2>', $content);
  $content = preg_replace('/<(.*?)marginheight=".*?"(.*?)>/is', '<$1$2>', $content);
  $content = preg_replace('/<(.*?) border=".*?"(.*?)>/is', '<$1 $2>', $content);
  $content = preg_replace('/<(.*?)webkitallowfullscreen=".*?"(.*?)>/is', '<$1$2>', $content);
  $content = preg_replace('/<(.*?)mozallowfullscreen=".*?"(.*?)>/is', '<$1$2>', $content);
  $content = preg_replace('/(<div> <\/div>)|(<p> <\/p>)|(<p><\/p>)/is', "<br>", $content);
  $content = preg_replace('/<font (.*?)>(.*?)<\/font>/is', "$2", $content);
  $content = preg_replace('/<font (.*?)>/is', "", $content);
  $content = preg_replace('/<\/font>/is', "", $content);
  $content = preg_replace('/<(.*?)lang=".*?"(.*?)>/is', '<$1$2>', $content);
  $content = preg_replace('/<(.*?)xml:lang=".*?"(.*?)>/is', '<$1$2>', $content);

  //youtube
  $pattern = '/<iframe[^>]+?youtube\.com\/embed\/(.+?)(\?[^>]+?)?"[^<]+?<\/iframe>/iu';
  $append  = '<amp-youtube layout="responsive" data-videoid="$1" width="800" height="450"></amp-youtube>';
  $content  = preg_replace($pattern, $append, $content);

  //iframe
  $content  = preg_replace('/<iframe(.*?)class="wp-embedded-content(.*?)>(.*?)<\/iframe>/is', '', $content);
  $content  = preg_replace('/<iframe/is', '<amp-iframe', $content);
  $content  = preg_replace('/<\/iframe>/is', '</amp-iframe>', $content);

  //videoタグ
  $pattern     = '/<video/i';
  $append      = '<amp-video layout="responsive"';
  $content = preg_replace( $pattern, $append, $content );

  return $content;
}
必要なJSを取得する
扱うampカスタムタグによって、読み込まなければならないJSライブラリがあります。本文中に埋め込みコードがあるかないかを判定して、必要なライブラリの埋め込みタグをテキストで取得します。
/*---------------------------------------------------*/
/*  AMP用JS・コンテンツ取得
/*---------------------------------------------------*/
function amp_required_content() {
  global $post;
  if(empty($post)){
    return;
  }

  $post_id = $post->ID;
  $transient_name = "amp_content_${post_id}";
  $result = get_site_transient($transient_name);
  if(!empty($result)){
    return $result;
  }

  $content = get_amp_contents();
  $out = "";

  if( strpos($content ,'<blockquote class="twitter-tweet"') !== false ){
    $out .= '<script async custom-element="amp-twitter" src="https://cdn.ampproject.org/v0/amp-twitter-0.1.js"></script>';
  }

  if( strpos($content ,'<amp-youtube') !== false ){
    $out .= '<script async custom-element="amp-youtube" src="https://cdn.ampproject.org/v0/amp-youtube-0.1.js"></script>';
  }

  if( strpos($content ,'<amp-iframe') !== false ){
    $out .= '<script async custom-element="amp-iframe" src="https://cdn.ampproject.org/v0/amp-iframe-0.1.js"></script>';
  }

  if( strpos($content ,'<amp-video') !== false ){
    $out .= '<script async custom-element="amp-video" src="https://cdn.ampproject.org/v0/amp-video-0.1.js"></script>';
  }

  $result = [
    'js'      => !empty($out) ? $out : '',
    'content' => $content
  ];

  set_site_transient($transient_name, $result, 60 * 60 * 24 * 30);

  return $result;
}
twitterの埋め込み、YouTubeの埋め込み、iframeの埋め込み、動画の埋め込みに対応させるためにコンテンツに要素があるか判定し、ある場合にampのライブラリを読み込ませます。それぞれのタグに対応したライブラリがない場合はエラーで怒られます。WordPressの埋め込み系がGutenbergでけっこう増えて、全部に対応するのは大変そうなので、とりあえず使うものだけに絞りました。
また、関数内で使っているget_amp_contents()はかなり重い処理を行うので、できればページ内では1回しか使いたくないので、使い回せるように戻り値として連想配列で返すようにしておきます。
ついでにTransient APIを使ってコンテンツのフィルター結果をWordPressに擬似的にキャッシュしておきます。(さすがにこの関数が重すぎたのでちょっとだけ対策・・・)
Transientは期限を30日間に設定していますが、編集・ステータス切り替え・更新などを行った時や、記事を削除した時などには消えるようにfunctions.phpにフックを追記しておきます。
/*-------------------------------------------*/
/*  Transient APIデータのクリア
/*-------------------------------------------*/
function clear_transient_cache() {
  global $post;
  if(empty($post)){
    return;
  }

  $post_type = get_post_type();

  if('post' === $post_type){
    $post_id = $post->ID;
    delete_site_transient("amp_content_${post_id}");
  }
}
add_action( 'publish_post', 'clear_transient_cache');
add_action( 'deleted_post', 'clear_transient_cache');
add_action( 'save_post', 'clear_transient_cache');
add_action( 'edit_post', 'clear_transient_cache');
テンプレートを作成する
single.php
//AMPページを判定する
if (is_amp()) {
  if ( have_posts() ) :
    while ( have_posts() ) :
      the_post();
      //ここにAMPページのソースを書く。
      //get_template_part()などでテンプレートを分けておく。
    endwhile;
  endif;
}
else {
 //オリジナルページのソース
 ・・・
}まずAMPページの判定をします。ここでget_template_part()を使って、オリジナルとAMPでテンプレートを分けておくと管理が楽です。
AMPテンプレート
サイトによってソースが変わりますので、ざっくりになりますが先ほどのphp関数を使って作ります。
<!DOCTYPE html>
<html ⚡>
<head>
  <meta charset="utf-8">
  <script async src="https://cdn.ampproject.org/v0.js"></script>
  <meta name="viewport" content="width=device-width,minimum-scale=1,initial-scale=1">
  <title><?php the_title()?></title>
  <link rel="canonical" href="【canonicalを入れる】">
  <?php
  $amp_content = amp_required_content();
  echo $amp_content['js'];
  ?>
  <script type="application/ld+json">
    {
      "@context"         : "http://schema.org",
      "@type"            : "BlogPosting",
      "mainEntityOfPage" :
      {
        "@type"            : "WebPage",
        "@id"              : "<?php the_permalink()?>"
      },
      "headline" : "<?php the_title_attribute()?>",
      "image"    :
      {
        "@type"  : "ImageObject",
        "url"    : "<?php echo esc_url(amp_eyecatch_info('src'))?>",
        "width"  : <?php echo esc_attr(amp_eyecatch_info('width'))?>,
        "height" : <?php echo esc_attr(amp_eyecatch_info('height'))?>
      },
      "datePublished" : "<?php echo esc_attr(get_the_date('c'))?>",
      "dateModified"  : "<?php echo esc_attr(get_the_modified_date('c'))?>",
      "author"        :
      {
        "@type" : "Person",
        "name"  : "<?php the_author()?>"
      },
      "publisher"     :
      {
        "@type"  : "Organization",
        "name"   : "notes by SHARESL",
        "logo"   :
        {
          "@type"  : "ImageObject",
          "url"    : "<?php echo esc_url(get_theme_file_uri('ロゴ画像.png'))?>",
          "width"  : 600,
          "height" : 60
        }
      },
      "description"     : "【ディスクリプション】"
    }
  </script>
  <style amp-boilerplate>body{-webkit-animation:-amp-start 8s steps(1,end) 0s 1 normal both;-moz-animation:-amp-start 8s steps(1,end) 0s 1 normal both;-ms-animation:-amp-start 8s steps(1,end) 0s 1 normal both;animation:-amp-start 8s steps(1,end) 0s 1 normal both}@-webkit-keyframes -amp-start{from{visibility:hidden}to{visibility:visible}}@-moz-keyframes -amp-start{from{visibility:hidden}to{visibility:visible}}@-ms-keyframes -amp-start{from{visibility:hidden}to{visibility:visible}}@-o-keyframes -amp-start{from{visibility:hidden}to{visibility:visible}}@keyframes -amp-start{from{visibility:hidden}to{visibility:visible}}</style><noscript><style amp-boilerplate>body{-webkit-animation:none;-moz-animation:none;-ms-animation:none;animation:none}</style></noscript>

</head>
<body>
  <main>
    <?php
    //投稿本文を出力
    echo $amp_content['content']
    ?>
  </main>
</body>
</html>
CSS
CSSは外部ファイルにできません。ampのルールに従って<head>タグ内に書きます。
<style amp-custom>
//ここにCSSを書く
</style>使えるCSSに制限があります。詳しくはこちらで確認してください。
1番ネックになるのがCSSの容量が「上限 50,000 バイト(50kb)」という制限です。
CSSはルールを確認しながら要らないところを削ってamp用にwebpackやgulpなどで圧縮してまとめておき、最終的にphpでインクルードさせます。
<style amp-custom>
  <?php
  //cssファイル読み込み
  $css = locate_template('css/amp.css');
  if(!empty($css)){
    ob_start();
    require_once $css;
    $raw_css = ob_get_contents();
    ob_end_clean();
    $replaced_css = str_replace('@charset "UTF-8";', '', $raw_css);
    echo $replaced_css;
  }
  ?>
</style>ob_start()とかob_end_clean()とか何してんだって感じですが、sassをコンパイルしたときに自動で@charset "UTF-8;"がCSSファイルの先頭に挿入されてしまい、これがどうにも消せなかったためphpで無理やり削除しています。 @charset "UTF-8;"が無い方は関係ないので以下のように普通に読み込んでください。
<style amp-custom>
  <?php
  //cssファイル読み込み
  require_once locate_template('css/amp.css');
  ?>
</style>
これでAMPにCSSを適用できるようになりました。
あとはオリジナルのソースをコピペしてきて、画像部分やシェアボタンなどをampのルールに従って変更し、CSSを調整していきます。
Google Analyticsに対応させる
GAの設定もしておきます。
まずAMPページには<head>要素に以下のコードを挿入します。
//AMPと非AMPページをまたいでアクセス解析を行うための設定
<meta name="amp-google-client-id-api" content="googleanalytics">

//AMP用のアナリティクス計測コード
<script async custom-element="amp-analytics" src="https://cdn.ampproject.org/v0/amp-analytics-0.1.js"></script><body>要素の1番下にもコードを追記します。UA-xxxxxxxxx-xの部分はGAのトラッキングIDです。
<amp-analytics type="gtag" data-credentials="include">
  <script type="application/json">
    {
      "vars" :
      {
        "gtag_id": "UA-xxxxxxxxx-x",
        "linker":
        {
          "domains": ["notes.sharesl.net"] //サイトのドメインを設定
        },
        "config" :
        {
          "UA-xxxxxxxxx-x": { "groups": "default" }
        }
      }
    }
  </script>
</amp-analytics>
次にオリジナルページのGAトラッキングコードに追記します。
<!-- Global site tag (gtag.js) - Google Analytics -->
<script async src="https://www.googletagmanager.com/gtag/js?id=UA-xxxxxxxxx-x"></script>
<script>
  window.dataLayer = window.dataLayer || [];
  function gtag(){dataLayer.push(arguments);}
  //linkerの設定を追記
  gtag('set', 'linker', {
    'domains': ['notes.sharesl.net']
  });
  gtag('js', new Date());
  //use_amp_client_idを追記
  gtag('config', 'UA-xxxxxxxxx-x', {'use_amp_client_id':true});
</script>
これでAMPページとオリジナルページ間をまたいで遷移した場合に同一ユーザーであればセッションが引き継がれるので正確に計測できます。
確認方法はこちらを参考にしてください。
AMP 用に Google アナリティクス セッション統合の初期設定を行う
https://support.google.com/analytics/answer/7486764?hl=ja#setup
SNSシェアボタンを追加する
SNSシェアボタンも、AMPでは独自の手法があります。
まずhead要素に以下のタグを追加します。
<script async custom-element="amp-social-share" src="https://cdn.ampproject.org/v0/amp-social-share-0.1.js"></script>続いてボタンのソース。
//Twitter
<amp-social-share type="twitter"></amp-social-share>

//Facebook
<amp-social-share type="facebook" data-param-app_id="【FacebookアプリID】"></amp-social-share>

//はてなブックマーク(未設定プロバイダ)
<?php
//ページURLをエンコード
$permalink = get_the_permalink();
$encoded_permalink = filter_var($permalink, FILTER_SANITIZE_ENCODED);

//タイトルをエンコード
$title = the_title_attribute('echo=0');
$encoded_title = filter_var($title, FILTER_SANITIZE_ENCODED);
?>
<amp-social-share
class="hatebu"
type="hatebu"
layout="container"
data-share-endpoint="https://b.hatena.ne.jp/add?mode=confirm&url=<?php echo $encoded_permalink?>;title=<?php echo $encoded_title?>"
>
<i class="icon icon-hatebu"></i>
</amp-social-share>
このサイトで使っている3種類を載せました。 上記のTwitterとFacebookに関してはデフォルトでアイコン付きのスタイルが当てられます。(FacebookのみFacebook for DevelopersでアプリIDの発行が必要)
公式ドキュメントを見ると他にもデフォルトでtype属性を変えるだけでemailやGoogle+などが用意されています。
はてなブックマークに関しては公式にデフォルトがないので、ドキュメントの「未設定プロバイダ用の共有ボタンを作成する」を参考に作りました。アイコンはCSSで背景にSVGを当てています。 もちろんFacebookやTwitterもdata-share-endpoint属性を使ってデフォルト以外の形にカスタマイズして使えるので、このサイトではオリジナルのソースを使いたかったのでその形にしました。
ページトップボタンを作成する
JSが使えないけど、ページトップボタンはAMPの機能で簡単に作ることができます。
<button type="button" on="tap:header.scrollTo('duration'=400)"></button>これだけ完成です。JSより簡単。
具体的には以下のような内容です。
<button type="button" on="tap:【スクロール先のid属性】.scrollTo('duration'=【スクロールのスピード(単位はミリ秒)】)"></button>ページ上部のheader要素やbody要素に任意のidを付けて、このボタンを設置するだけです。
AMPをテストする
AMPテストツールを使います。
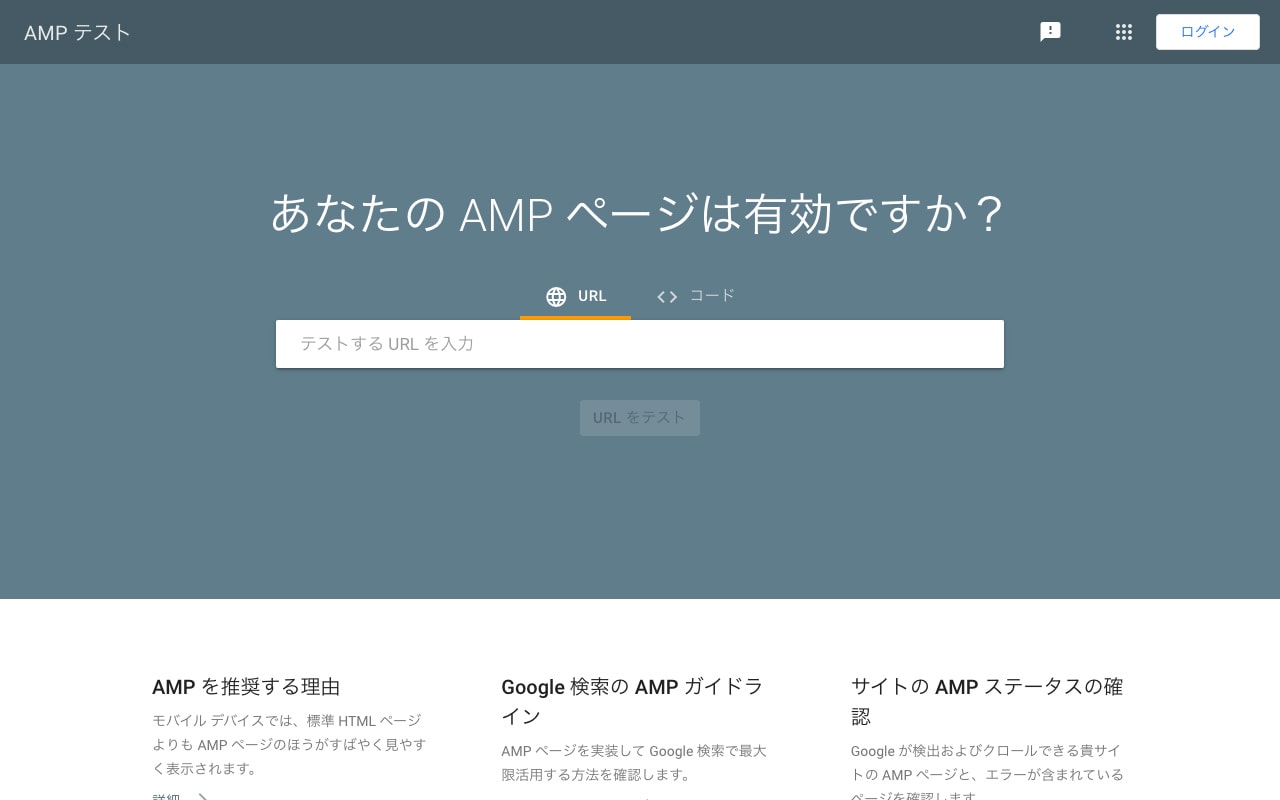
ここでエラーが出なくなれば完成です!
このページをここまで書いた手順でAMP化しているので、参考としてリンクを載せておきます。
さいごに
全て作った後で知りましたが、プラグインを適用しながら簡単にカスタムテンプレートを作る方法があるみたいです。先にちゃんと調べてそっちで試してみればよかった。笑
そっと参考URLを載せておきます。
【AMP For WordPress】WordPressのAMPプラグインで出力されるページのレイアウトやデザインをcssでカスタマイズしよう【templatesファイル】
https://blogenist.jp/2018/12/18/7317/
また機会があればプラグインを使った方法も試してみようと思います。
内容についてコメントやご指摘があればTwiiterにお願いします。

![netlify UPDATE BUILD IMAGE [ビルドイメージの更新]](https://notes.sharesl.net/wp-content/uploads/2022/09/netlify-update-build-image-660x440.jpg)


![AudioVisualizer [ howler.js + SVG ]](https://notes.sharesl.net/wp-content/uploads/2021/07/svg-audiovisualizer-660x440.jpg)




![AVIF [ gulpでjpg・pngからAVIF画像を生成 ]](https://notes.sharesl.net/wp-content/uploads/2022/09/avif-660x440.jpg)
![MutationObserverでDOMを監視[PhotoSwipe(v5)+Swiper(v8)連携]](https://notes.sharesl.net/wp-content/uploads/2022/08/mutationobserver-660x440.jpg)
